If you’ve ever worked on anything involving payment terminals, you know how frustrating it can be to troubleshoot EMV transactions when things go wrong. Back when I was integrating EMV support for one of our merchant platforms, I had to dig deep just to figure out what was really happening behind that innocent little tap or insert.
This post is my attempt to simplify that process for you. Whether you’re a developer, QA, or a curious architect, I’ll walk you through the actual lifecycle of an EMV transaction—based on how I saw it play out in one of our deployments (yep, real war stories here).
Heads up: this is written for developers working on POS terminals, host systems, or gateways. But even if you’re just curious, I tried to make it readable without going full RFC mode.
What We’ll Cover
Before we get started, here’s the high-level journey an EMV transaction takes:
- Card is presented
- Application Selection
- Initiate Application Processing
- Read Application Data
- Offline Data Authentication (ODA)
- Cardholder Verification
- Terminal Risk Management
- Terminal Action Analysis
- Card Action Analysis
- Online Authorization
- Completion
Don’t worry, we’ll take each one step-by-step. I’ll even include snippets from my terminal logs and debug sessions to make things more grounded.
Prerequisites for the Transaction
Before a transaction even begins, some groundwork is already laid:
- The terminal is EMV certified with its kernel and parameters up to date.
- The merchant has a valid AID list configured.
- The cardholder presents a chip-based EMV card (contact or contactless).
- A CAPK file is loaded in the terminal to support authentication.
1. Card is presented
When a chip card is inserted or tapped, the terminal’s EMV kernel is activated and begins its magic.
Card Detected: Contact Interface Activated
ATR Received: 3B 67 00 00 00 73 C8 40 13 00 90 00
2. Application Selection
The terminal reads the card’s supported applications (AIDs) and matches them with its own list. If multiple AIDs match, the terminal may prompt the cardholder to choose. In our configuration, selection was mostly automatic unless the card had multiple wallets or co-brands.
Pro Tip: If you’re seeing error code 0x82 after this stage, check your AID matching configuration.
3. Initiate Application Processing
The terminal sends a SELECT command (APDU) for the chosen AID. The card replies with the FCI Template, which contains:
- Application Label
- PAN (Primary Account Number)
- PDOL (Processing Data Object List)
4. Read Application Data
Next, the terminal sends a GET PROCESSING OPTIONS request, based on PDOL.
80 A8 00 00 02 83 00 00The card responds with an Application File Locator (AFL), guiding the terminal on which records to read. These records typically contain Track 2 Equivalent Data, Expiry Date, and other vital elements.
5. Offline Data Authentication (ODA)
Now it gets serious. The terminal performs offline data authentication to ensure the card is genuine.
- SDA (Static Data Authentication)
- DDA (Dynamic Data Authentication)
- CDA (Combined Data Authentication)
In our project, we enabled DDA. The terminal validated the signed data using public keys from CAPKs (pre-loaded by the acquirer or processor).
6. Cardholder Verification (CVM)
This step checks how to verify the cardholder:
- Offline PIN
- Online PIN
- Signature
- No CVM required
For small-value transactions, “No CVM Required” was common, especially for tap-and-go payments. We had some issues where the wrong CVM list caused rejections, worth checking during certification.
7. Terminal Risk Management
The terminal evaluates whether it should approve offline or request online authorization. It checks for:
- Floor limits
- Velocity counters
- Exception files or blacklists
We had a couple of cases early in production where overly strict risk checks caused offline approvals to fail unnecessarily.
8. Terminal Action Analysis
The terminal uses data from all previous steps to decide what kind of cryptogram to request:
- ARQC (go online)
- AAC (decline offline)
- TC (approve offline)
The terminal prepares this request but the final decision still depends on the card.
9. Card Action Analysis
The terminal sends a GENERATE AC command to the card. The card replies with a cryptogram:
- ARQC = Authorization Request Cryptogram (go online)
- AAC = Application Authentication Cryptogram (decline)
Command: 80 AE 80 00 ...
Response: 77 ... 9F27 01 80 (ARQC)
If the cryptogram is valid, the transaction moves to the next phase.
10. Online Authorization
This is where the terminal sends all the transaction data to the host for online approval. The payload typically includes:
- ARQC
- PAN
- Amount
- Terminal data (TVR, TSI, etc.)
In our case, we used ISO 8583 to communicate with the acquiring host. The host responds with:
- Authorization code
- Response code
- ARPC (Authorization Response Cryptogram)
11. Completion
After online processing, the terminal completes the transaction with a final GENERATE AC command. This tells the card whether it was approved or declined.
If approved, the card may update internal logs (like ATC). The terminal prints the receipt and stores transaction logs for clearing and settlement.
Transaction Complete – Application Approved
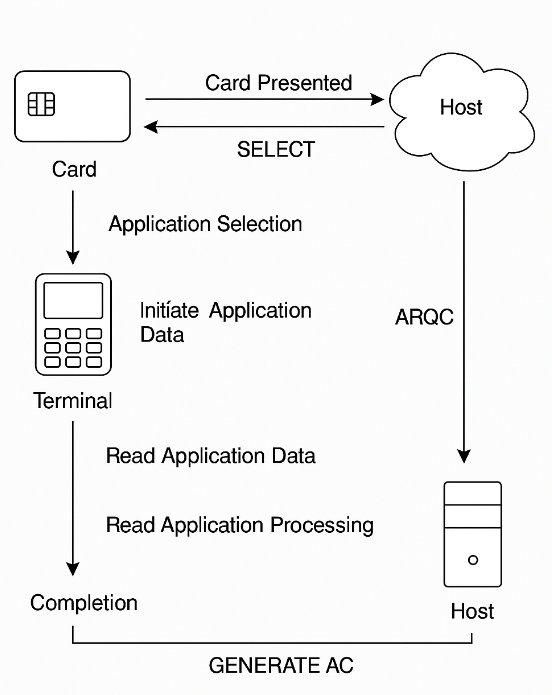
TC: 9F26 08 12 AB ...Sample EMV Transaction Flow Diagram
To make everything clearer, here’s a visual summary of the EMV transaction process. The diagram below outlines how the card, terminal, and host system interact at each key stage—from card presentation and data exchange to online authorization and final completion. This should help reinforce the step-by-step breakdown we discussed in the previous section.
Common Issues We Encountered
| Issue | Cause | Fix |
|---|---|---|
| 0x6A82 | File Not Found | Misconfigured AID |
| CVM Failures | CVM list mismatch | Validate CVM table and priority |
| ARQC Mismatch | Crypto keys out of sync | Update host MAC/ARQC logic |
Reflections from the Project
This project taught me that an EMV transaction is far more than just tap, beep, print. It’s a careful dance of cryptographic handshakes, risk assessments, and validation rules, all within a few seconds.
What surprised me the most was how small configuration issues (like a wrong CVM fallback or stale CAPK) could silently cause failures.
References and Resources
- EMVCo Specifications
- ISO/IEC 7816 Smart Card Standards
- Real-world logs and configs from my EMV implementation project (2024)