If you’ve ever worked on anything related to payments, especially with EMV cards, you know that sometimes it feels like opening a black box. You swipe or insert a card, magic happens, and the transaction gets processed. But what’s really going on inside that chip?
In one of my recent projects integrating EMV transactions with our payment gateway and testing with certification tools from the schemes, I had to dig deeper into the actual structure of an EMV card. I realized there’s a whole miniature file system inside that chip, complete with directories, pointers, and identifiers.
This post is a continuation of what I started in TLV Demystified: How EMV Cards Store and Share Data, but this time I want to go deeper. Let’s talk about the file structure inside an EMV card, including Application Identifiers (AIDs), Short File Identifiers (SFIs), and how everything ties together.
A Quick Look Inside the Chip
Think of an EMV card like a tiny computer. It has a secure chip, memory, and it follows a very strict file system based on ISO/IEC 7816 standards.
There are basically three types of files:
- Master File (MF) – like the root directory / in a Linux system.
- Dedicated File (DF) – like folders/subdirectories.
- Elementary File (EF) – these are the actual data files.
But most of the time in EMV, you won’t see MF because many cards are structured with just Application DFs.
File System Hierarchy Example
Here’s how it typically looks:
+-- Master File (MF) [optional]
    |
    +-- Dedicated File (DF) - Application 1 (e.g., Visa, Mastercard)
    |     |
    |     +-- Elementary File (EF) - Application Label
    |     +-- EF - Processing Options (GPO)
    |     +-- EF - Records (e.g., PAN, Expiry Date, Track 2 Equivalent Data)
    |
    +-- Dedicated File (DF) - Application 2 (if multi-application)
          |
          +-- EF - Metadata
          +-- EF - Logs
Note: Some EMV cards don’t explicitly implement MF; they go straight to selecting the Application (DF) by its AID.
In practice, when the terminal sends a SELECT command for an AID, it accesses a DF directly, bypassing the MF layer altogether. Each DF contains its own set of EFs holding the application-specific data, and terminals use SFIs and record numbers to retrieve individual elements like the PAN, cardholder name, or expiration date.
This hierarchical setup is what allows the EMV card to remain secure yet flexible for different applications and schemes.
Navigating the EMV Application Layer: From Selection to Data Access
Now that we’ve seen how an EMV card’s internal file system is organized, let’s talk about how a terminal actually finds and talks to the right application inside the chip.
Remember, each EMV card may contain multiple applications—like one for Visa credit and another for Mastercard debit. To make sense of all that, the terminal uses Application Identifiers (AIDs), which act like unique “addresses” for each app inside the card. Once the right application is selected, the terminal uses Short File Identifiers (SFIs) to fetch the actual data records like your PAN or expiration date without knowing the full file path.
In this next section, we’ll walk through:
- What an AID is and how it helps the terminal pick the right app
- How the terminal and card exchange information step by step
- Why SFIs exist and how they simplify data access
Let’s take it one layer deeper.
What’s an AID?
Application Identifier (AID) is a unique identifier that selects the specific application stored in the chip.
An AID is composed of:
- RID (Registered Application Provider Identifier): The first 5 bytes, issued by ISO
- PIX (Proprietary Application Identifier Extension): The optional rest, defined by the card scheme (like Mastercard, Visa, AMEX).
For example:
A0000000031010- A000000003 – This is Visa’s RID.
- 1010 – Application-specific (Visa Debit or Visa Credit, for example
When a terminal wants to talk to the card, it sends a SELECT command with this AID.
AID and SFI + Record Flow Diagram
Here’s a helpful way to visualize how the terminal communicates with the chip using AID and SFI/Record combinations:
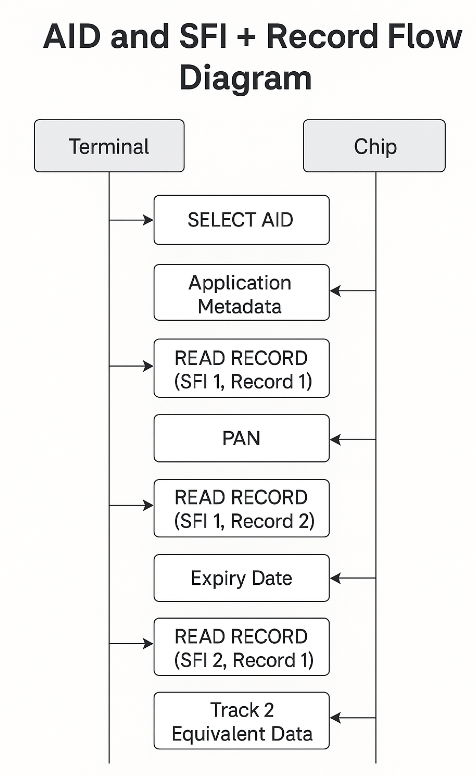
This diagram captures:
- How applications are selected using AID: The terminal initiates communication by sending a SELECT AID command to pick a specific application on the card—like Visa or Mastercard.
- How the chip responds with application metadata: The chip returns a set of metadata including the application label, processing options, and the Application File Locator (AFL), which tells the terminal where the data records are stored.
- How SFI and records are used to fetch specific fields: With the AFL as a guide, the terminal sends READ RECORD commands to retrieve individual fields such as the PAN (Primary Account Number), expiration date, and Track 2 Equivalent Data. Each data element is stored under specific SFIs and record numbers.
This flow ensures an organized and predictable communication pattern between the terminal and the card, enhancing both efficiency and security in EMV transactions.
How the Terminal Selects an Application
During card insertion, the terminal reads the PSE (Payment System Environment) this could be:
- 1PAY.SYS.DDF01 for contact cards
- 2PAY.SYS.DDF01 for contactless
This gives a directory listing of supported applications.
Each application entry includes:
- AID
- Label (e.g., VISA CREDIT)
- Priority
- SFI to records (we’ll get to this!)
Short File Identifiers (SFIs)
Here comes one of the underrated but super useful parts: SFIs.
SFIs are like quick shortcuts (or file handles) to access data records inside a file. Rather than giving the full file path or name, terminals can just say:
“Give me record 1 of file with SFI 2”
This is done using READ RECORD commands.
Example:
READ RECORD (SFI=2, Record=1)The SFI is actually only 5 bits long, and combined with the record number to form a command like this:
00 B2 01 0C 00Where:
- 01 is record number
- 0C means SFI=2 + other flags
In many cards, SFI 1–10 are used for application data like PAN, cardholder name, expiration date, etc.
Real-World Tip: Card Debugging with Tools
During one project, we had to decode transaction logs using an EMV sniffing tool. It was the first time I paid attention to how SELECT, READ RECORD, and GET PROCESSING OPTIONS (GPO) interact.
In our logs, we saw entries like:
SELECT AID A0000000031010
GPO
READ RECORD SFI 1 Record 1
READ RECORD SFI 2 Record 1
It became clear that understanding how the file system and SFIs work is critical when you troubleshoot failed transactions or misconfigured terminals.
Common Gotchas
- If the terminal selects an unsupported AID, the card returns 6A82 – File not found.
- Some cards don’t expose all SFIs – they must be discovered via AFL (Application File Locator).
- PSE directories may not exist in some configurations (fallback to AID selection is needed).
Sources and Tools
If you want to explore this more deeply, here are some good starting points:
- EMVCo – EMV Specifications
- EMV Book 1: Application Independent ICC to Terminal Interface
- Personal experience during EMV certification projects with acquirers and test cards.
Final Thoughts
I know this stuff can be a little dense when I first got involved with EMV years ago, I remember staring at APDU logs like they were hieroglyphs. But once you start mapping out the file structure and the role of AIDs and SFIs, it becomes much easier to follow the flow.
And honestly, once you see a full transaction decode that works, you’ll appreciate just how smart and secure this card system is.
Hope this post helped give you a clearer picture of what’s inside your chip card. Next time you insert your card at the POS terminal, maybe you’ll smile knowing that behind that beep is a structured conversation between terminal and chip organized just like a little file system.